Master Levels for Doom 2 Continuing Progress
Intro
Getting the old Doom games to sometimes can take a bit of work. Getting The Ultimate Doom, Doom II and Final Doom to run isn't too bad, just takes a little setup. Master Levels For Doom II is unfortunately a little bit more involved and complicated, though certainly still doable.
This guide is specifically for getting Master Levels For Doom II to run with your source port of choice (or even through ZDL), and it assumes that you know a little bit about source ports and such. If you're not familiar with those, or are looking to mod the other 90's Doom games then I suggest you check out my other guide about Doom modding.
https://steamcommunity.com/sharedfiles/filedetails/?id=1638612812
What You Need
You will need a couple things to get Master Levels For Doom II running smoothly.
- Master Levels For Doom II - Obviously, buy it off Steam if you don't already have it. (Only available as part of the Doom Classic Complete bundle).
- A source port - Use your source port of choice. I recommend GZDoom[zdoom.org] but any source port should do.
- An archive/zip tool - I recommend 7zip[www.7-zip.org].
- Master Levels Menu Interface - For selecting levels. Download[www.doomworld.com]it from one of the mirrors on the page.
- A lump editor - I used Slade[slade.mancubus.net]
You can use other tools for each purpose than what I listed, however the instructions in this guide will assume you're using the above. You might have to do things slightly differently if using a different tool, so if you're unsure about that, just download what I linked above. (Though if you already have a different preferred tool, you probably know what you're doing enough to figure it out). All the tools I linked are free and legal downloads. (Except the game itself, which you can ya know, buy from Steam).
Add The Menu To The Master Levels For Doom II Folder
The menu interface that comes with Master Levels For Doom II by default is... pretty ugly to say the least, not to mention it's not the most functional. Observe:
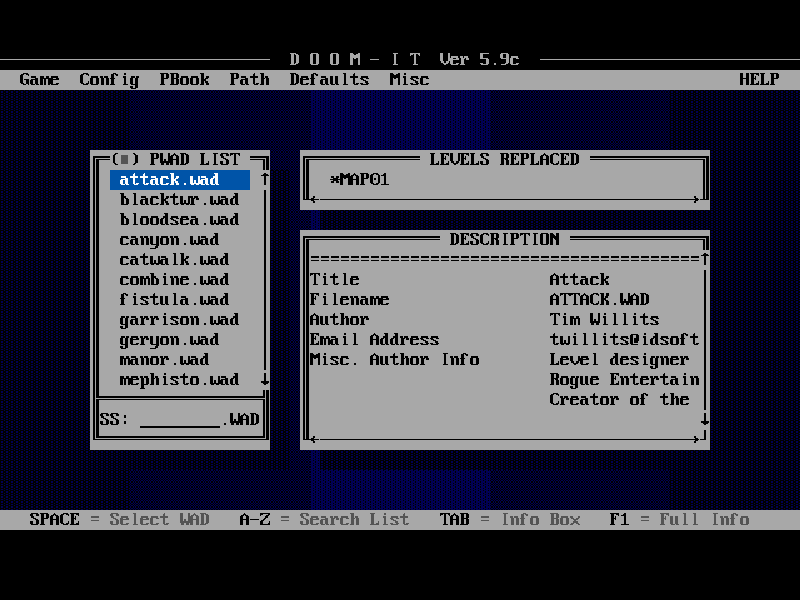
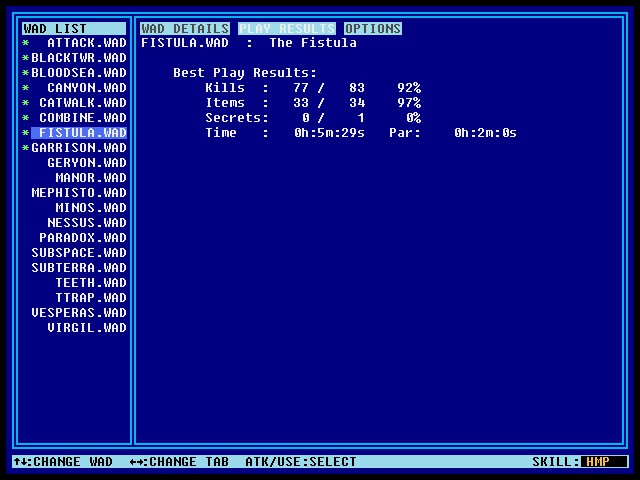
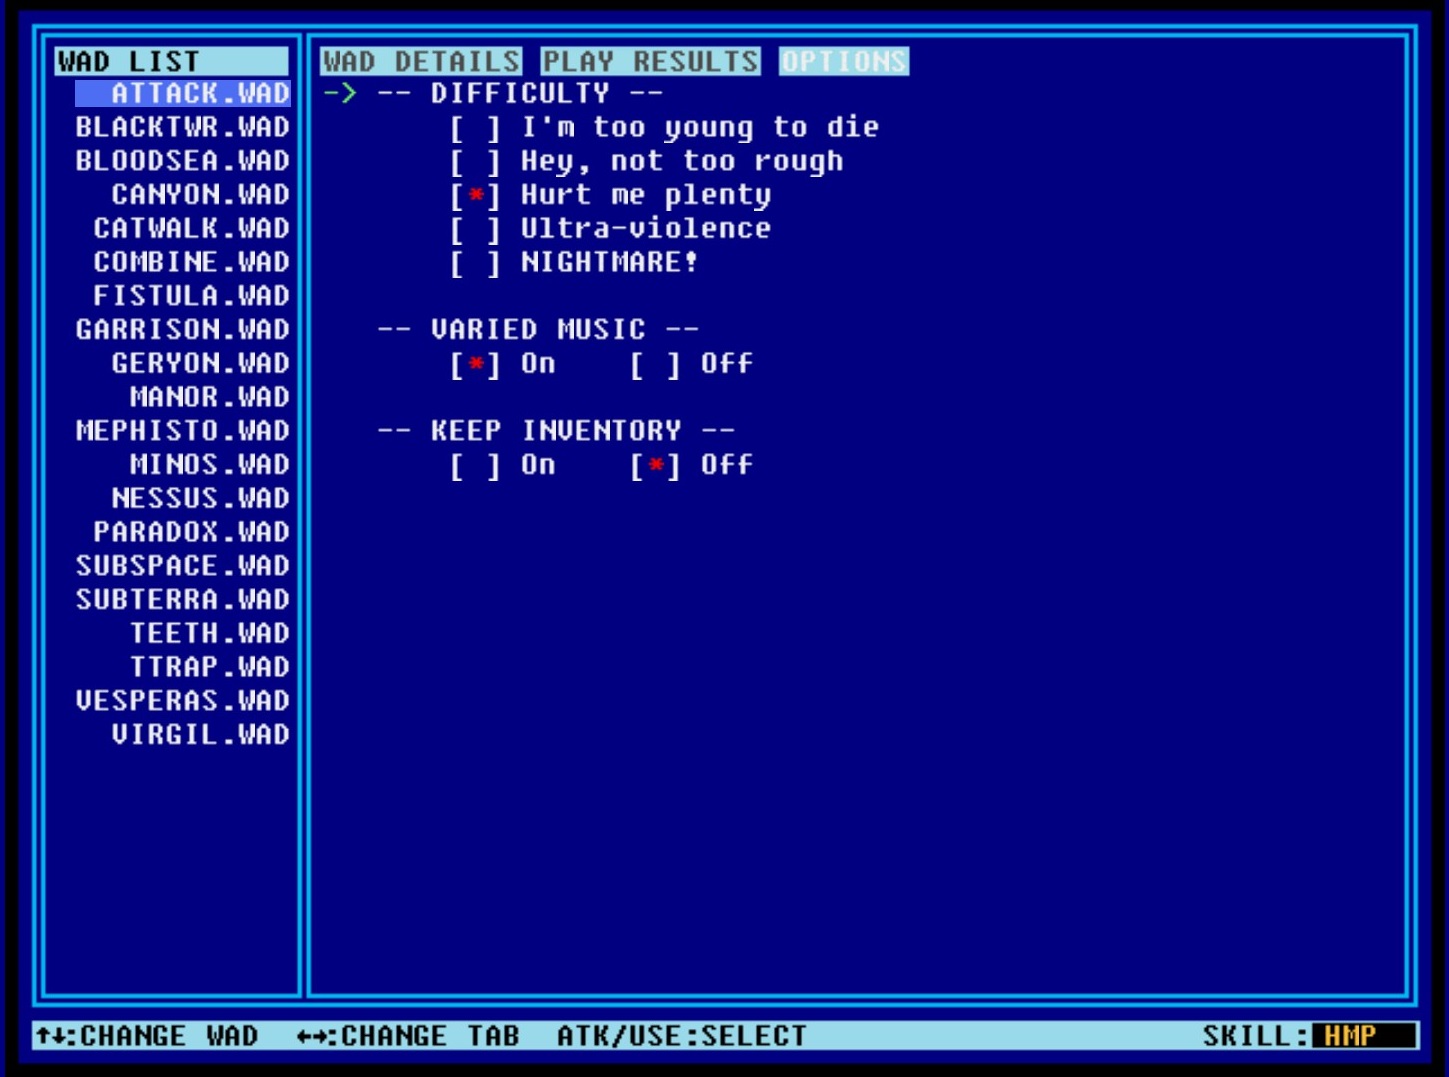
The new menu we're adding not only looks better, but it'll allow us to keep our items between levels (you don't normally in this game), vary the music more (since it mostly uses the same theme over and over), and tweak a few more options.
It's still not the fanciest thing ever, but it's a lot better.
First thing you're going to need to do is put that new menu in the Master Levels For Doom II Steam folder. By default that'll be:
C:\Program Files (x86)\Steam\steamapps\common\Master Levels of Doom
Or you can copy/paste the following into File Explorer:
%ProgramFiles(x86)%\Steam\steamapps\common\Master Levels of Doom
Paste the "zdmlmenu.zip" that you downloaded earlier in this folder. (Link again[www.doomworld.com] in case you didn't download it earlier, if you did it's the exact same link).
Extract the "zdmlmenu.zip" to the folder. You should now have a file called "ZDLMENU.pk3" (you may have to copy/paste it from a new "zdlmenu" folder that was created). Anyway, make sure that "ZDLMENU.pk3" is your Master Levels of Doom folder.
Now that that's there we have to edit a WAD.
Editing The TEETH.WAD
We have to edit one of the WADs since it actually contains two levels (the level itself, and a secret level). Don't worry, it's not as hard as it sounds.
From the "Master Levels of Doom" folder navigate to the folder "master" and then "wads." The default path for this is:
C:\Program Files (x86)\Steam\steamapps\common\Master Levels of Doom\master\wads
This folder contains all the levels for the game. Each level has a .WAD file and a .txt file with some info about it. We only care about the .WAD files. If you don't have Windows set to show the file extensions all .WAD files will be the ones that don't have a text document icon next to them and won't open in a text editor when you click them.
We need to:
1). Create a copy of "TEETH.WAD" and name it "TEETH2.WAD"
2). Remember Slade[slade.mancubus.net] from earlier? Go ahead and open that up. If this is your first time launching it you can just click "next" through the setup, we don't have to do anything fancy here.
3). Drag and drop "TEETH.WAD" into the Slade window.

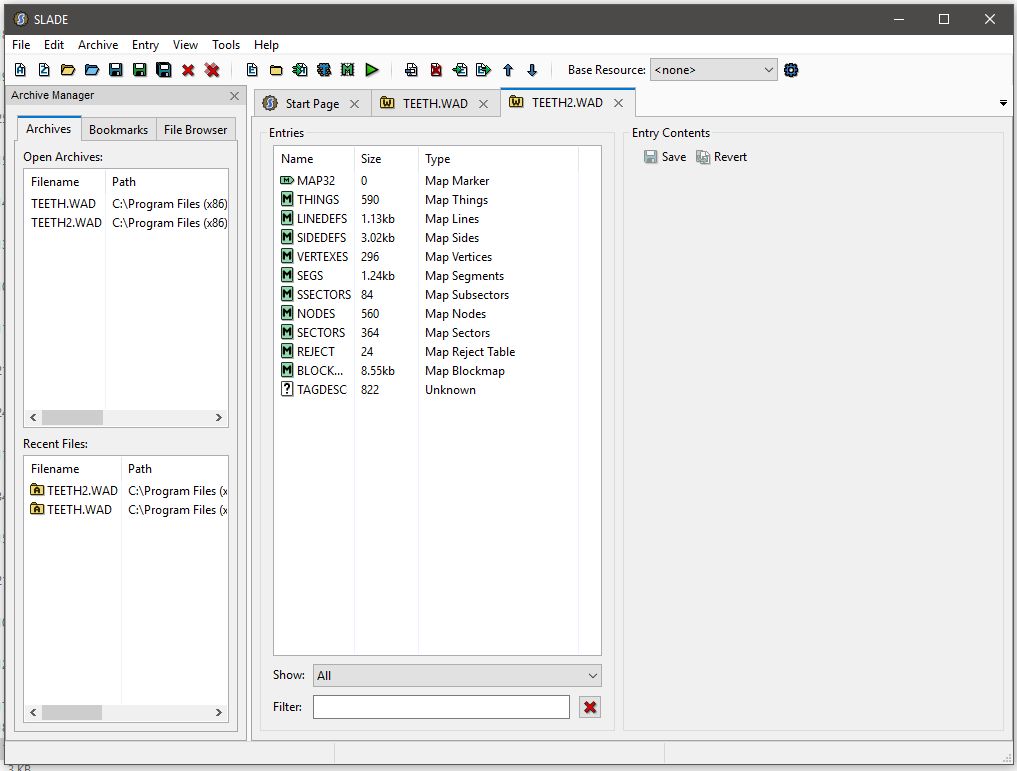
4). We need to delete a few "lumps" from this file. Before you edit it it'll look like:
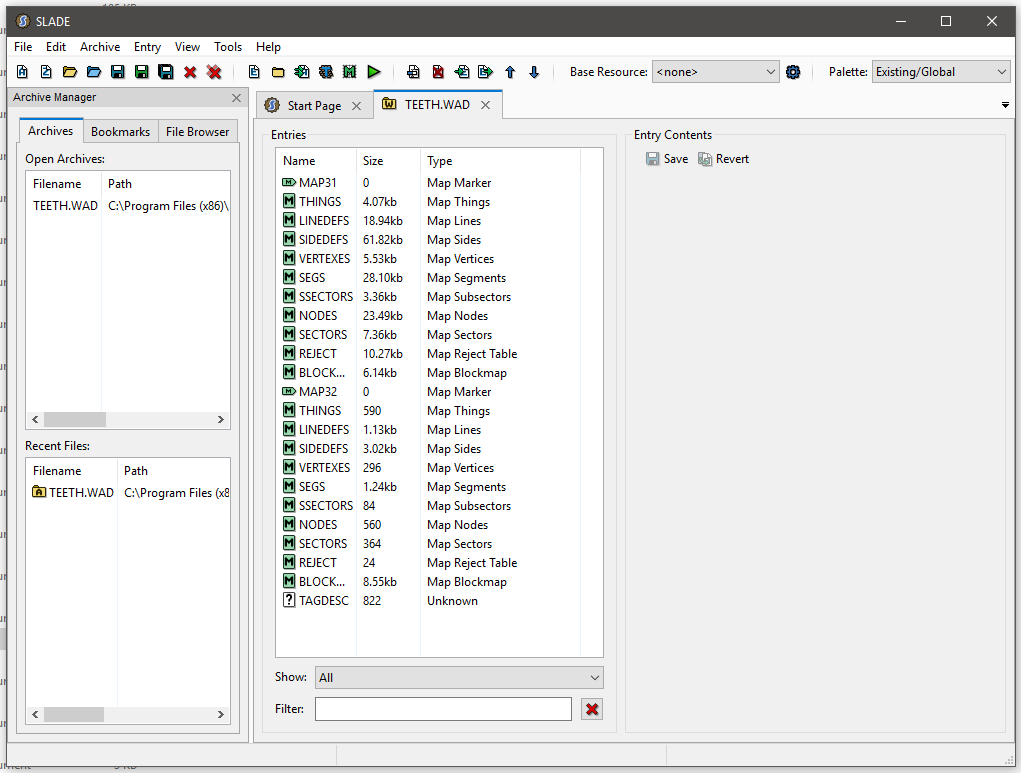
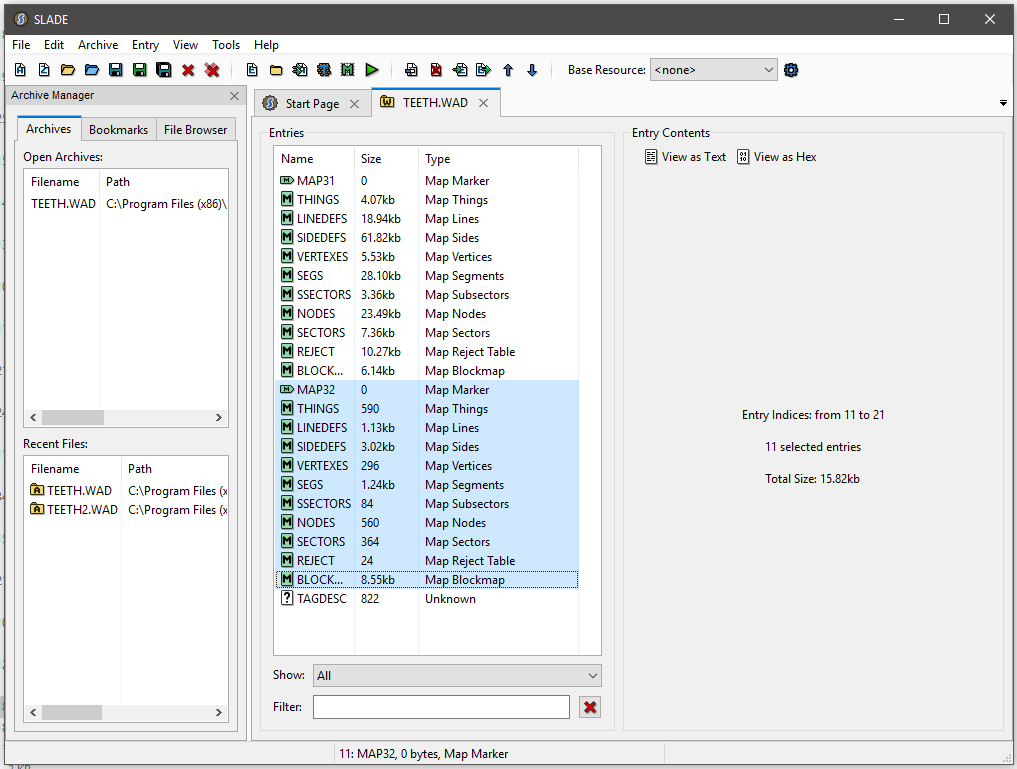
5). We need to delete the lump that says "MAP32" and the 10 lumps that follow it. They are: HINGS, LINEDEFS, SIDEDEFS, VERTEXES, SEGS, SSECTORS, NODES, SECTORS, REJECT, and BLOCKMAP. (Highlighted in the pic).
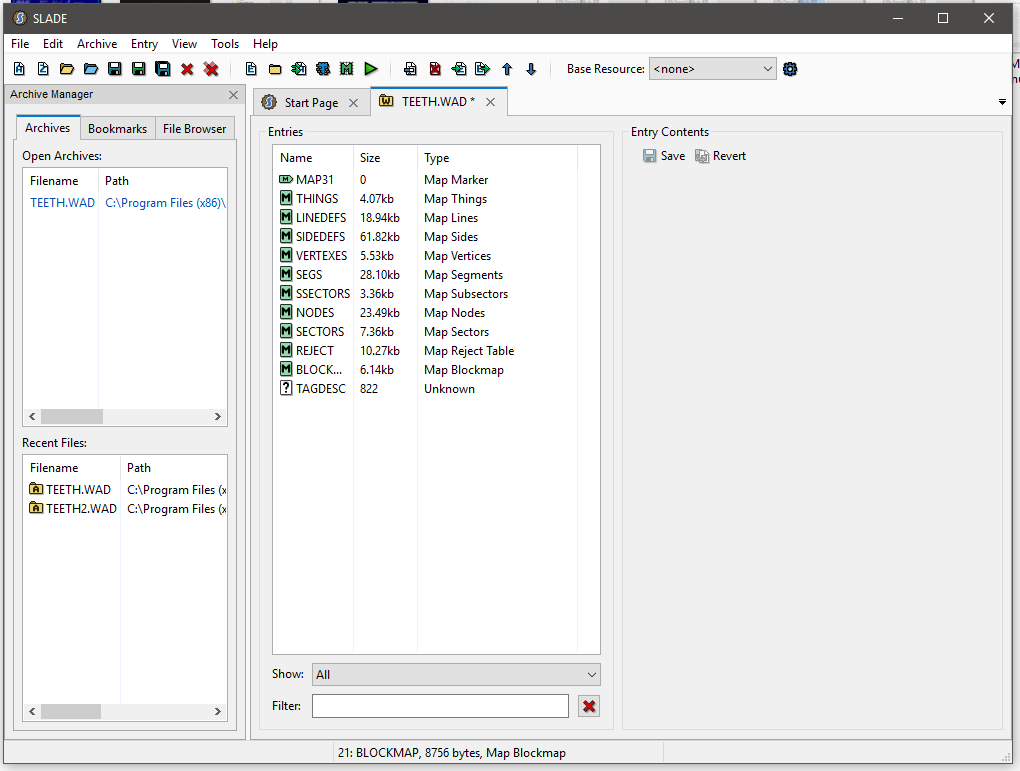
6). Save the file. It should now look this:
7). We now need to something very similar with the "TEETH2.WAD" so drag and drop that onto Slade now.
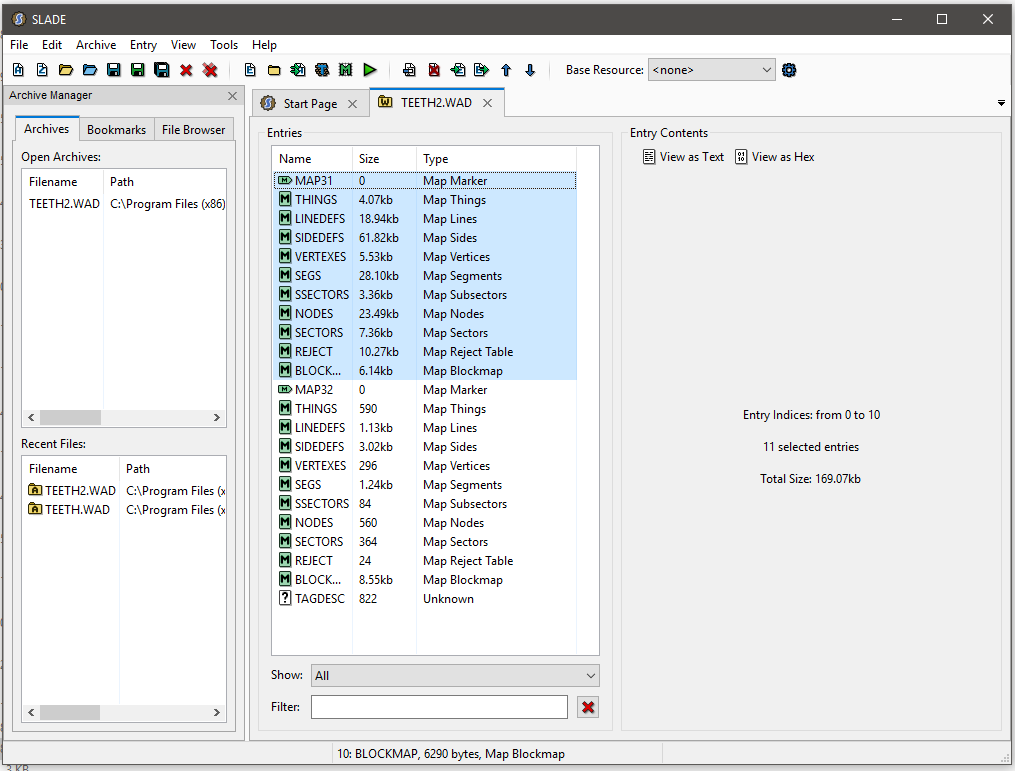
8). This time we need to delete "MAP31" and the 10 lumps that follow, they have the same names as before, but are listed after "MAP31" and before "MAP32" this time. (HINGS, LINEDEFS, SIDEDEFS, VERTEXES, SEGS, SSECTORS, NODES, SECTORS, REJECT, and BLOCKMAP.
Highlighted in the pic).
9). Save the file. It should now look this:
10). Close Slade.
We're done editing .WAD files now. Now we need these files to our new menu.
Add The WADs to The Menu
So we've finished editing the TEETH.WAD, now we need to add all these levels to the menu so that it knows what to do with them.
1). Go back to the "Master Levels of Doom" folder.
C:\Program Files (x86)\Steam\steamapps\common\Master Levels of Doom
2). Open "ZDMLMENU.pk3" with 7zip[www.7-zip.org]
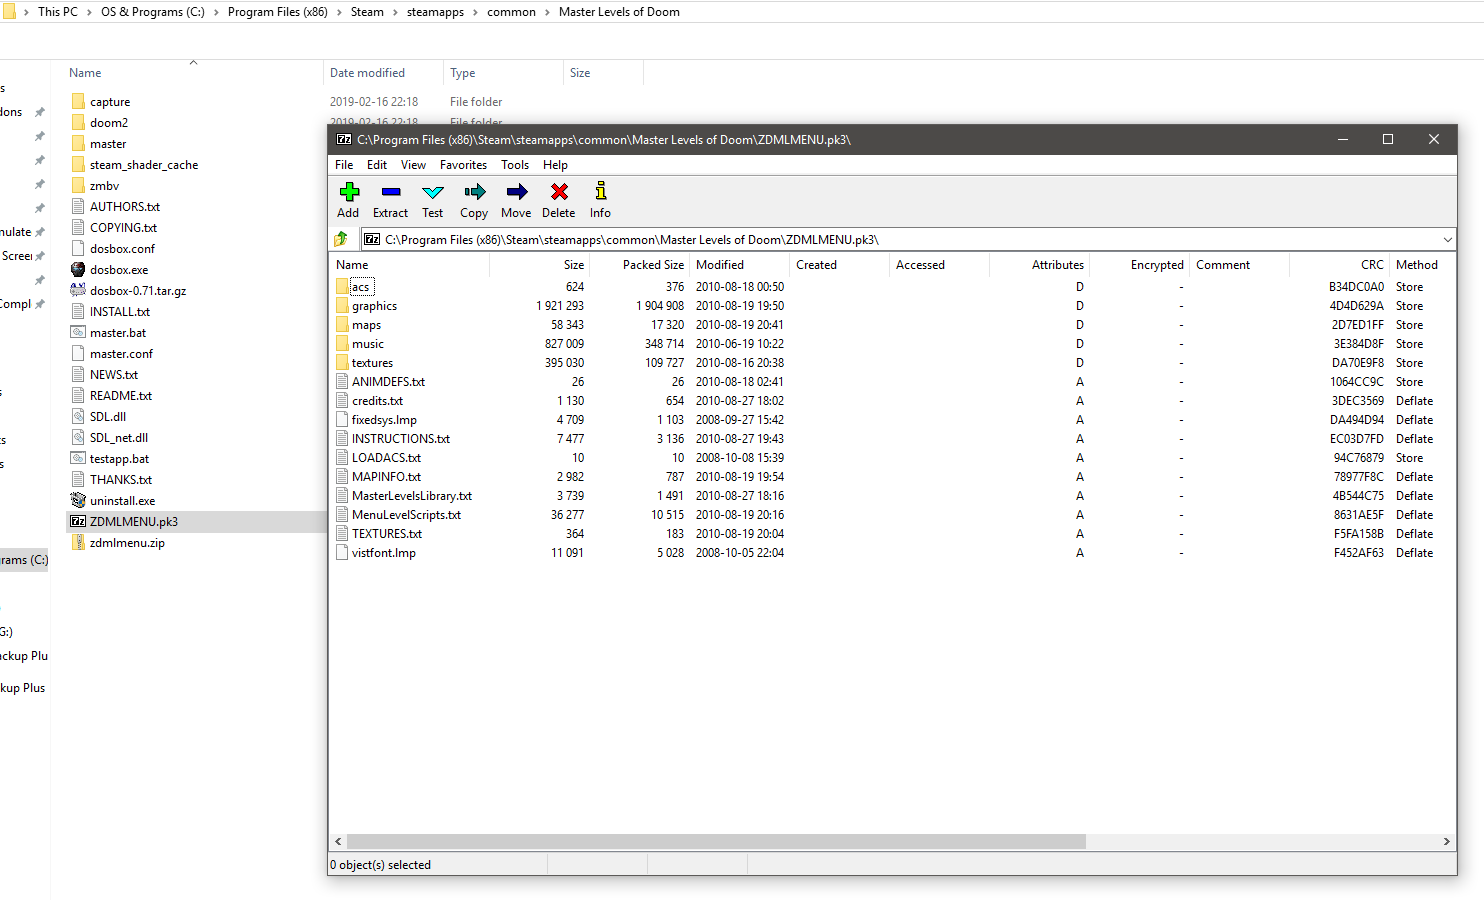
3). In the 7zip window click on the "maps" folder. You'll see two WADs already there, just leave them. We don't have to edit anything, just add our maps.
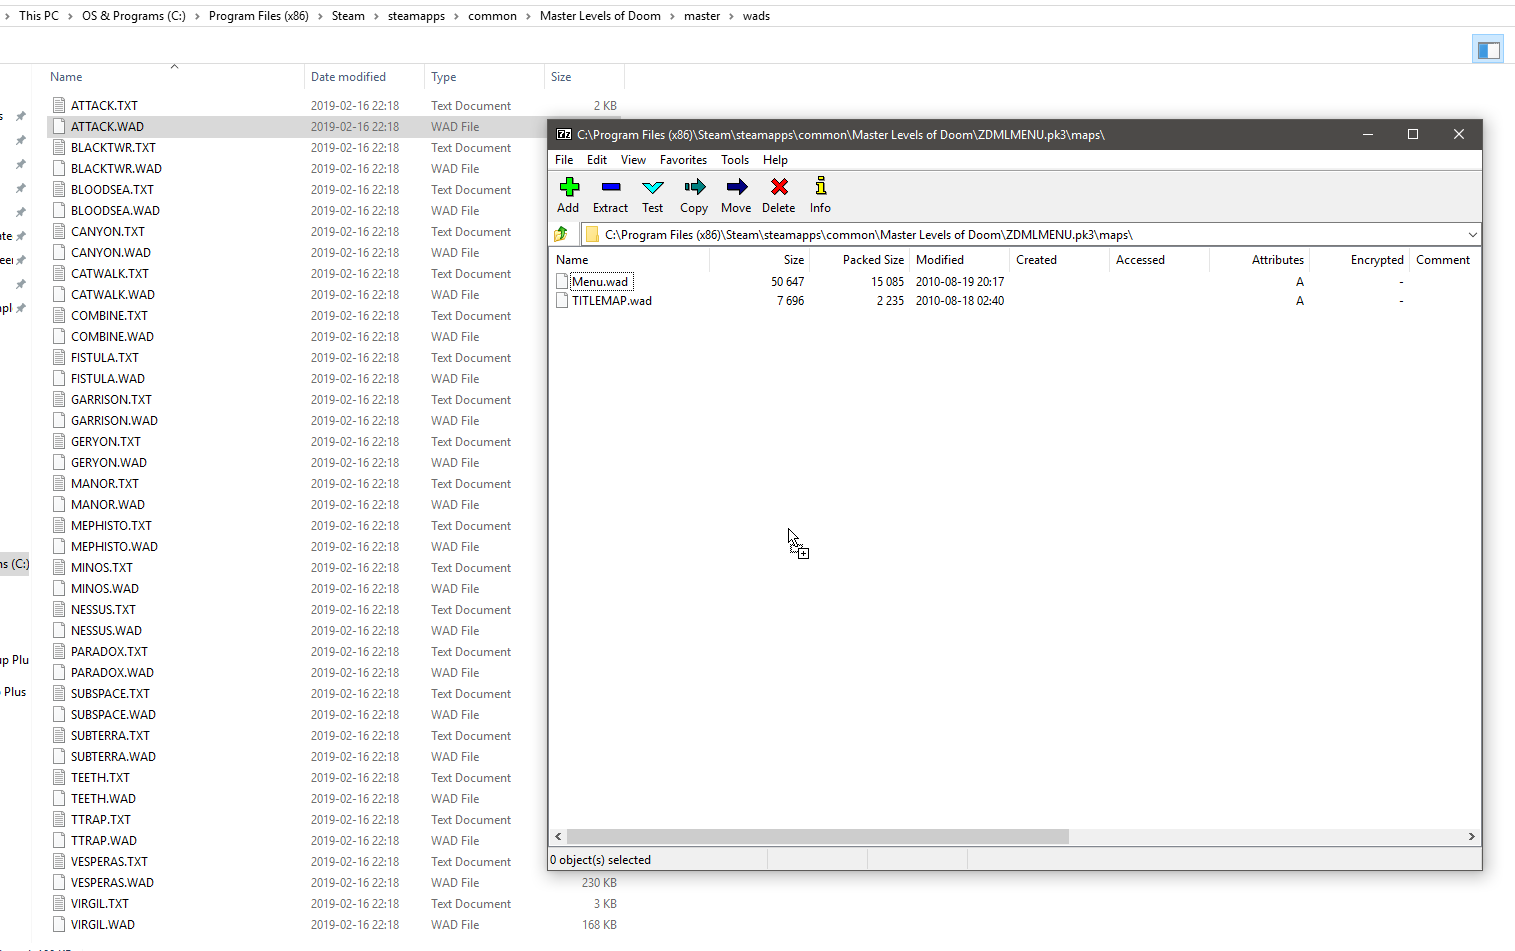
3). Now in File Exlporer go back to the "wads" folder:
C:\Program Files (x86)\Steam\steamapps\common\Master Levels of Doom\master\wads
4). Drag and drop all the WAD files (including the "TEETH.WAD" you edited and the "TEETH2.WAD" you made) into the 7zip folder. (You can hold down ctrl and click on each WAD to drag and drop them all at once).
Remember, if you don't have Windows set to show the file extensions all .WAD files will be the ones that don't have a text document icon next to them and won't open in a text editor when you click them.
All right now we just need to set up our source port and we'll be good to go.
Setting Up The Source Port
Now we just need to set it up so that we use our source port. There's two things we need to do for this.
Installing The Source Port
This is pretty simple and straight forward, and if you read my other guide it's nothing new.
1). Download your source port of choice, such as GZDoom[zdoom.org]
2). Paste the zip folder you downloaded into the "Master Levels of Doom" folder:
C:\Program Files (x86)\Steam\steamapps\common\Master Levels of Doom
3). Extract the contents of the source port into the "Master Levels of Doom" folder.
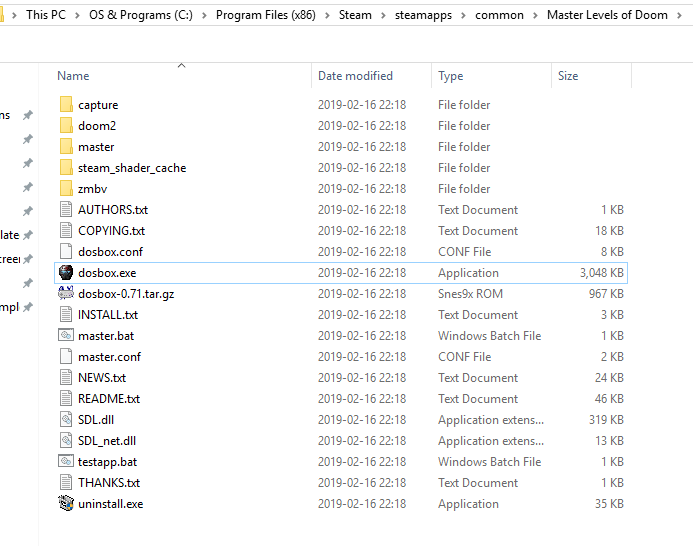
4). Look for the program/file in the "Master Levels of Doom" folder named either "dosbox" or "dosbox.exe". Rename this to either "Steamdosbox" or "Steamdosbox.exe". (If you see the .exe at the end or not depends on if you set Windows to show file extensions or not. It won't really matter either way).
5). Rename your source port to "dosbox" or "dosbox.exe". In this case "gzdoom.exe" is renamed to "dosbox.exe".
Your source port is ready to go!
Setting Steam To Launch The ZDMLMENU
This is also pretty simple and straight forward.
1). In your Steam library games list right click Master Levels For Doom II and select "Properties."
2). Under the "General" tab click "Set Launch Options."
3). In the box that pops up type:
-file ZDMLMENU.pk3
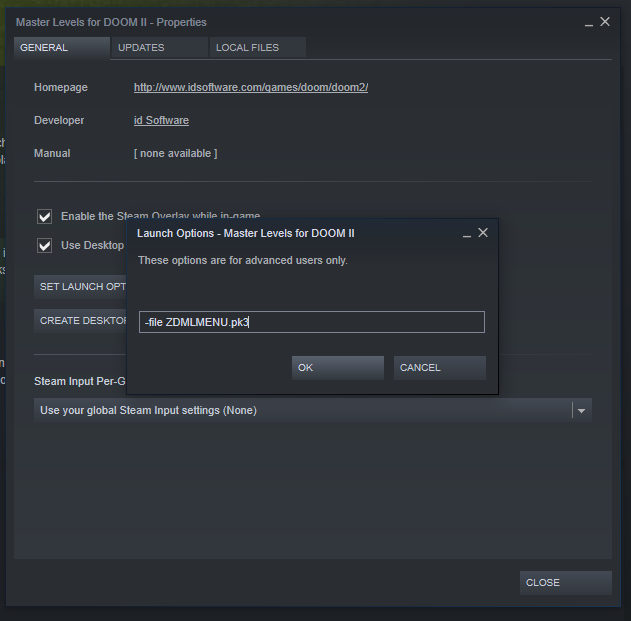
Now when you click "Play" in your Steam library it'll launch both your source port and the new menu we added.
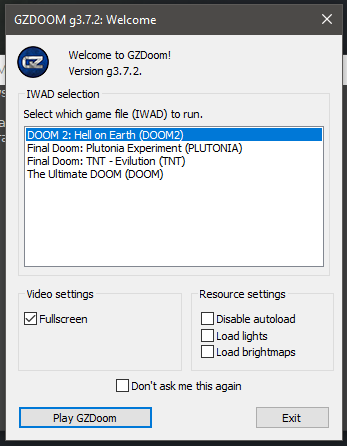
If you're using GZDoom and it asks you which IWAD to use make sure you select "Doom II" or else the game won't work.
Now Master Levels For Doom II is all set to run through Steam without issues!

Running Master Levels Through ZDL (Optional)
Maybe you're like me and you just really like using ZDL to launch all your classic Doom games. It does make switching between source ports easier, as well as enabling Brutal Doom on Master Levels more easily (assuming you used my source port method). If you're not sure how to set up ZDL, check out my other Doom modding guide.
https://steamcommunity.com/sharedfiles/filedetails/?id=1638612812
Once you've got ZDL set up you can just click "Play" for "Master Levels" in Steam to launch ZDL. Select your source port and make sure that your IWAD is set to Doom II.
Since we still have the "-file ZDMLMENU.pk3" in the launch options for "Master Levels" we don't have to go searching for the file using ZDL's external files options. (Not that doing so is difficult).
Do note that ZDL will keep "ZDMLMENU.pk3" in the external files options even after closing the game, meaning that the next time you launch it it'll still be there. If it's there more than and you're trying to run "Master Levels" that's a non-issue, however if you want to play a different Doom game you'll need to remove it from the external files list first.
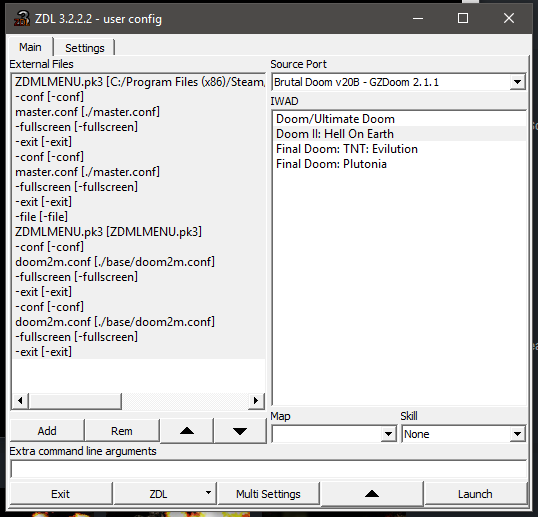
All you have to do for that is select it in the "External Files" list and click "Rem" to remove it. This will only remove it from ZDL launching it and won't affect the file itself, meaning that next time you launch "Master Levels" everything will still play just fine.
Conclusion
I hope this guide was helpful in getting Master Levels For Doom II running smoothly for you. I know I had a hell of a time getting it to work at first, when I'd rather be blasting my way through Hell.

Source: https://steamcommunity.com/sharedfiles/filedetails/?id=1658162458
0 Response to "Master Levels for Doom 2 Continuing Progress"
Post a Comment